JWT Session描述 在浏览器端用户登录后,服务器端生成唯一session id,并且把用户名和session id建立对应关系保存到服务器端,当下次浏览器端访问时携带着cookie和服务器保存session对应,就可以直接登录了。
Session缺点 1、对于分布式集群环境,session数据保存在服务器内存中就不合适了,应该放到一个中心状态服务器上。ASP.NET Core支持Session采用Redis、Memcached。
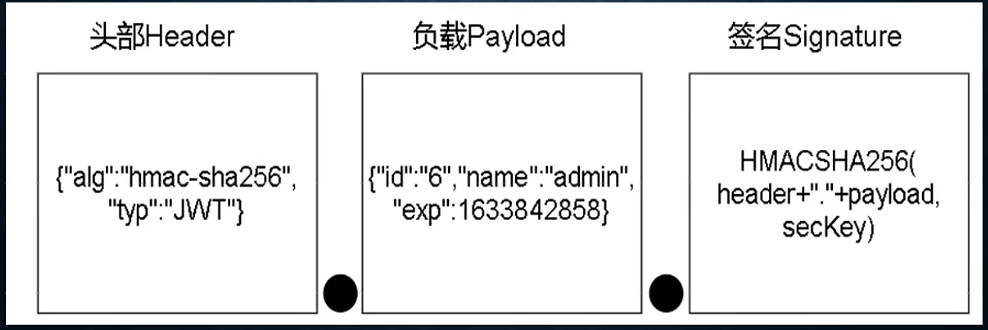
JWT描述 1、JWT把登陆信息保存在客户端。
JWT优点 1、状态保存在客户端,天然适合分布式签名。
JWT基本使用 NuGet安装:
1
2
3
4
5
6
7
8
9
10
11
12
13
14
15
16
17
18
19
20
21
22
23
24
25
26
// See https://aka.ms/new-console-template for more information using Microsoft.IdentityModel.Tokens; using System.Data; using System.IdentityModel.Tokens.Jwt; using System.Security.Claims; using System.Text; List<Claim> claims = new List<Claim>();//一个claim代表一条用户信息,尽量使用ClaimTypes的值 claims.Add(new Claim("Passport", "123456")); claims.Add(new Claim("QQ", "8888888888")); claims.Add(new Claim("Id", "6666")); claims.Add(new Claim(ClaimTypes.NameIdentifier, "11111 ")); claims.Add(new Claim(ClaimTypes.Name, "LJH")); claims.Add(new Claim(ClaimTypes.HomePhone, "8364799655")); claims.Add(new Claim(ClaimTypes.Role, "admin")); claims.Add(new Claim(ClaimTypes.Role, "manager")); string key = "suibianshurudiandongxi,jinliangchangyidian";//签名的key,不能泄露 DateTime expire = DateTime.Now.AddHours(1);//过期时间 byte[] secBytes = Encoding.UTF8.GetBytes(key); var secKey = new SymmetricSecurityKey(secBytes); var credentials = new SigningCredentials(secKey, SecurityAlgorithms.HmacSha256Signature); var tokenDescriptor = new JwtSecurityToken(claims: claims, expires: expire, signingCredentials: credentials); string jwt = new JwtSecurityTokenHandler().WriteToken(tokenDescriptor);//JWT令牌 Console.WriteLine(jwt);
校验:
1
2
3
4
5
6
7
8
9
10
11
12
13
14
15
16
17
18
19
20
21
//调用JwtSecurityTokenHandler类对JWT令牌进行解码 using Microsoft.IdentityModel.Tokens; using System.IdentityModel.Tokens.Jwt; using System.Security.Claims; using System.Text; string jwt = Console.ReadLine()!; string secKey = "suibianshurudiandongxi,jinliangchangyidian"; JwtSecurityTokenHandler tokenHandler = new(); TokenValidationParameters valParam = new(); var securityKey = new SymmetricSecurityKey(Encoding.UTF8.GetBytes(secKey)); valParam.IssuerSigningKey = securityKey; valParam.ValidateIssuer = false; valParam.ValidateAudience = false; //不合法的key生成的jwt或者篡改过的jwt就会报错 ClaimsPrincipal claimsPrincipal = tokenHandler.ValidateToken(jwt, valParam, out SecurityToken secToken); foreach (var claim in claimsPrincipal.Claims) { Console.WriteLine($"{claim.Type}={claim.Value}"); }
ASP.NETCore对JWT的封装 NuGet安装:
1
2
3
4
5
//appsetting.json "JWT": { "SecKey": "asjdofiwengwieh*audsh&sdy$", "ExpireSeconds": "3600" }
1
2
3
4
public class JWTSettings { public string SecKey { get;set; } public int ExpireSeconds { get; set; } }
1
2
3
4
5
6
7
8
9
10
11
12
13
14
15
16
17
18
19
//Program.cs builder.Services.Configure<JWTSettings>(builder.Configuration.GetSection("JWT")); builder.Services.AddAuthentication(JwtBearerDefaults.AuthenticationScheme) .AddJwtBearer(opt => { var jwtSettings = builder.Configuration.GetSection("JWT").Get<JWTSettings>(); byte[] keyBytes = Encoding.UTF8.GetBytes(jwtSettings.SecKey); var secKey = new SymmetricSecurityKey(keyBytes); opt.TokenValidationParameters = new() { ValidateIssuer = false, ValidateAudience = false, ValidateLifetime = true, ValidateIssuerSigningKey = true, IssuerSigningKey = secKey }; }); ............... app.UseAuthentication();//在app.UseAuthorization();前使用中间件 app.UseAuthorization();
1
2
3
4
5
6
7
8
9
10
11
12
13
14
15
16
17
18
19
20
21
22
23
24
25
26
27
28
29
30
31
32
//Demo1Controller [Route("[controller]/[action]")] [ApiController] public class Demo1Controller : ControllerBase { private readonly IOptionsSnapshot<JWTSettings> jwtSettings; public DemoController(IOptionsSnapshot<JWTSettings> jwtSettings) { this.jwtSettings = jwtSettings; } [HttpPost] //用户登录,返回jwt public ActionResult<string> Login(string userName,string password) { if(userName == "LJH" && password == "123456") { List<Claim> claims = new List<Claim>(); claims.Add(new Claim(ClaimTypes.NameIdentifier,"1")); claims.Add(new Claim(ClaimTypes.Name, userName)); claims.Add(new Claim(ClaimTypes.Role, "admin")); string key = jwtSettings.Value.SecKey; DateTime expires = DateTime.Now.AddSeconds(jwtSettings.Value.ExpireSeconds); byte[] secBytes = Encoding.UTF8.GetBytes(key); var secKey = new SymmetricSecurityKey(secBytes); var credentials = new SigningCredentials(secKey, SecurityAlgorithms.HmacSha256Signature); var tokenDescriptor = new JwtSecurityToken(claims: claims, expires: expires, signingCredentials: credentials); string jwt = new JwtSecurityTokenHandler().WriteToken(tokenDescriptor); return jwt; } else { return BadRequest(); } } }
1
2
3
4
5
6
7
8
9
10
11
12
13
14
15
16
17
18
19
20
[Route("[controller]/[Action]")] [ApiController] [Authorize]//该控制下所有action都需要登录才能访问 public class Demo2Controller : ControllerBase { [HttpGet] public string Test1() { var claim = this.User.FindFirst(ClaimTypes.Name);//可通过这个方式从jwt字符串的payload中解析并获取当前登录用户的用户名 return "ok"; } [AllowAnonymous]//有这个特性,不登录也可调用该action [HttpGet] public string Test2() { return "666"; } [Authorize(Roles = "admin")]//角色为admin的才可以访问这个action [HttpGet] public string Test3() { return "888"; } }
在需要登录才能访问的控制器或者Action上添加[Authorize]。
[Authorize]的注意事项 1、ASP.NET Core中身份验证和授权验证的功能由Authentication、Authorization中间件提供:app.UseAuthentication()、app.UseAuthorization()。
Swagger携带JWT报文头 1 2 3 4 5 6 7 8 9 10 11 12 13 14 15 builder.Services.AddSwaggerGen(c => { var scheme = new OpenApiSecurityScheme() { Description = "Authorization header. \r\nExample: 'Bearer 12345abcdef'", Reference = new OpenApiReference{Type = ReferenceType.SecurityScheme, Id = "Authorization"}, Scheme = "oauth2",Name = "Authorization", In = ParameterLocation.Header,Type = SecuritySchemeType.ApiKey, }; c.AddSecurityDefinition("Authorization", scheme); var requirement = new OpenApiSecurityRequirement(); requirement[scheme] = new List<string>(); c.AddSecurityRequirement(requirement); });
JWT的缺点 1、到期前令牌无法被提前撤回。什么情况下需要撤回?